


Canvas: Course Design
Canvas: Course Design
Creating a Course Homepage
The default homepage in Canvas is modules. It is fine to use that as your course homepage. (Next week’s Canvas email will provide info on using modules as the course homepage.) However, if you would like to create a homepage with general course info similar to the template that has been provided in the past, the following video and step-by-step instructions will show you how to do so.
Creating a Course Homepage (5:24) by Wanda Coyle
Step-by-Step Instructions for Creating a Course Homepage
- Select Pages in the course navigation on the left.
- Select +Page.
- Give the page a name, eg, Homepage, etc.
- Enter your course/instructor information.
- Include a link to your syllabus if you would like.
- Place your cursor where you would like for the link to appear in the page.
- From the toolbar above the content area, select the documents icon.
- Select in the Upload File area to browse your computer.
- Navigate to your syllabus on your computer.
- Select Submit.
- A link to your syllabus will appear in the location of your cursor.
- Select Save and Publish.
- From the screen that appears with the page you just created, select the vertical ellipsis in the upper right-hand corner of the page and choose “Use as Front Page”.
- Select Home from the course navigation on the left.
- From the menu on the right, select Choose Homepage.
- Select “Pages Front Page” and select Save.
The newly created page is now your “Homepage" and will be the landing page when students access your course. Please note that, by default, the course number and name will show as the title of this page.
Organizing Content
Creating a Module and Adding Content to the Module
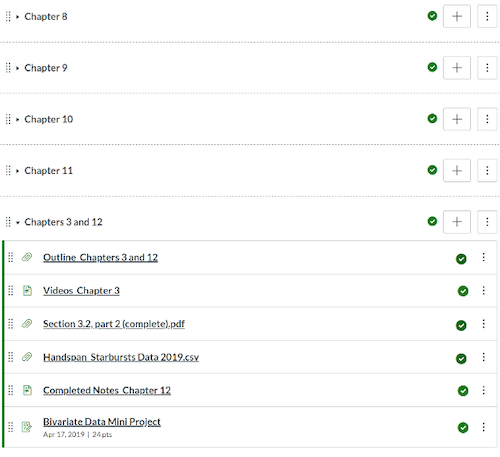
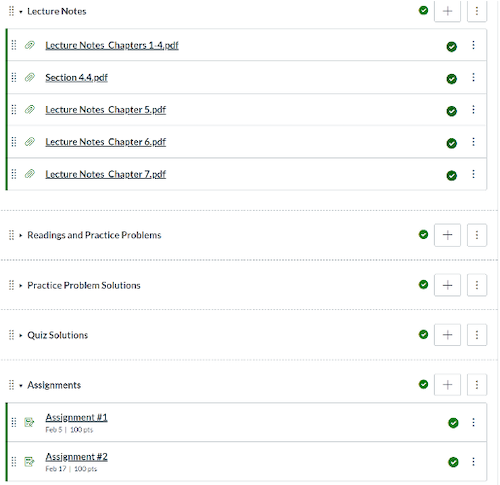
In Canvas, the best way to organize content is by using Modules. You can organize content by chapters, by weeks, by unit, by the type of content, etc. Here are screenshots for organizing content by chapters and by type of content (please note that the content in some modules is collapsed so that several modules could be shown):
By Chapter (below):
By type of content (below):
The following video demonstrates how to create a module and how to add files, pages, videos, discussion, assignments, etc. to the module:
Adding Content to Canvas using Modules (16:12) by Wanda Coyle
Here are step-by-step instructions:
Create a Module
- Select Modules in the menu on the left.
- Select the +Module button on the top right.
- Name the Module and select Add Module.
- At this point, the Module is Unpublished. Don’t forget to publish it by selecting the to the right when you’re ready for students to see it.
Add a document to a Module
- Select the plus sign on the right in the appropriate module.
- Select the down arrow to access the list of items that can be added to a module and choose File.
- Select New File.
- Select the Choose File (or Browse) button, then navigate to the document you would like to upload and double select it.
- Select Add Item (Note that files are automatically published).
Add a Content Page
Necessary for uploading a video saved on your computer.
- Select the plus sign on the right in the appropriate module.
- Select the down arrow to access the list of items that can be added to a module and choose Content Page.
- Select on New Page.
- Name the Page and select Add Item (note that the content page is Unpublished at this point).
Add a Video to a Content Page
Adding videos that you have created and/or that are saved on your computer.
- Select the Content Page that you created.
- Select the Edit button on the top right.
- Place your cursor where you would like for the video to appear in the content page.
- From the toolbar above the content area, select the record/upload media icon.
- Select in the upload area to browse your computer.
- Navigate to the video you want and double select it.
- Select Submit.
- Don’t forget to select Save at the bottom of the page.
Adding a link to a YouTube or other online video
- Navigate to the video you would like to add and copy the embed code (URL
- Go to your content page and place your cursor where you would like for the video to appear.
- From the toolbar above the content area, select the Embed icon on the far right.
- Paste the embed code in the space provided.
- Select submit.
- Don’t forget to select Save at the bottom of the page.
Add an Assignment to a Module
- Select the plus sign on the right in the appropriate module.
- Select the down arrow to access the list of items that can be added to a module and choose Assignment.
- Select New Assignment.
- Name the Assignment, then select Add Assignment.
- You will now be back in the Modules page. Select the Assignment that you just created.
- Select Edit in the upper right-hand corner.
- Add a description of the assignment in the box at the top of the page
- Enter a point value for the assignment in the box provided.
- Change submission type to Online and select the appropriate option
- Enter a due date for the assignment.
- Select Save and Publish.
- If you need to edit the assignment after you have saved and published it, select the name of the assignment in the module and then select edit. Don’t forget to select save after making the necessary edits.
Add a link to an External URL
Links to YouTube videos, websites, etc.
- Select the plus sign on the right in the appropriate module.
- Select the down arrow to access the list of items that can be added to a module and choose External URL. • Copy and paste the URL from the video, website, etc.
- Name the page.
- Select Add Item (note that the page is Unpublished at this point...select to publish the page).
Add a Discussion to a Module
- Select the plus sign on the right in the appropriate module.
- Select the down arrow to access the list of items that can be added to a module and choose Discussion.
- Select New Topic.
- Name the topic and then select Add Item.
- You will now be back in the Modules page. Select the Discussion that you just created.
- Select Edit in the upper right-hand corner.
- Add a description of the discussion.
- Attach a file if you would like.
- Select any of the available options (I like to use threaded replies so that replies are grouped with original posts).
- Choose Group Discussion if you would like to have small-group discussions (rather than whole class).
- You can manually choose the groups or have them automatically created in whatever size you specify.
- Select dates for which you want the discussion to be available.
- Select Save and Publish.
Add a Text Header to a Module
- Select the plus sign on the right in the appropriate module.
- Select the down arrow to access the list of items that can be added to a module and choose Text Header.
- Type the text you'd like to add as a module sub-header.
- Select Add Item (note that the text header is Unpublished at this point...click the to publish the header).